IMPORTANT UPDATE
This post is outdated now that AWS Lambda allows users to create and distribute layers with all sorts of plugins and packages, including Selenium and chromedriver. This simplifies a lot of the process. Here’s a post on how to make such a layer. And here’s a list of useful pre-packaged layers.
This post should be used as a historical reference only.
TL;DR: This post details how to get a web scraper running on AWS Lambda using Selenium and a headless Chrome browser, while using Docker to test locally. It’s based on this guide, but it didn’t work for me because the versions of Selenium, headless Chrome and chromedriver were incompatible. What did work was the following:
EDIT: The versions above are no longer supported. According to this GitHub issue, these versions work well together:
- chromedriver 2.43
- severless-chrome 1.0.0-55
- selenium 3.14
The full story
I recently spent several frustrating weeks trying to deploy a Selenium web scraper that runs every night on its own and saves the results to a database on Amazon S3. With this post, I hope to spare you from wanting to smash all computers with a sledgehammer.
First, some background
I wanted to scrape a government website that is regularly updated every night, detect new additions, alert me by email when something is found, and save the results. I could have run the script on my computer with a cron job on Mac or a scheduled task on Windows.
But desktop computers are unreliable. They can get unplugged accidentally, or restart because of an update. I wanted my script to be run from a server that never turns off.
At the NICAR 2018 conference, I learned about serverless applications using AWS Lambda, so this seemed like an ideal solution. But the demo I saw, and almost all the documentation and blog posts about this use Node.js. I wanted to work in Python, which Lambda also supports.
Hello serverless
How can something be serverless if it runs on an Amazon server? Well, it’s serverless for you. You don’t have to set up the software, maintain it, or make sure it’s still running. Amazon does it all for you. You just need to upload your scripts and tell it it what to do. And it costs pennies a month, even for daily scrapes.
Hello PyChromeless
This guide is based mostly off this repo from 21Buttons, a fashion social network based in Barcelona. They did most of the heavy work to get a Selenium scraper using a Chrome headless browser working in Lambda using Python. I simply modified it a bit to work for me.
Download their repo onto your machine. The important files are these:
- Dockerfile
- Makefile
- docker-compose.yml
- requirements.txt
The rest you can delete.
Hello Lambda
Lambda is Amazon’s serverless application platform. It lets you write or upload a script that runs according to various triggers you give it. For example, it can be run at a certain time, or when a file is added or changed in a S3 bucket.
This is how I set up my Lambda instance.
1. Go to AWS Lambda, choose your preferred region and create a new function.
2. Choose “Author from scratch”. Give it a function name, and choose Python 3.6 as the runtime. Under “Role”, choose “Create new role from template”. Roles define the permissions your function has to access other AWS services, like S3. For now give this role a name like “scraper”. Under “Policy templates” choose “Basic Edge Lambda permissions”, which gives your function the ability to run and create logs. Hit “Create function”.
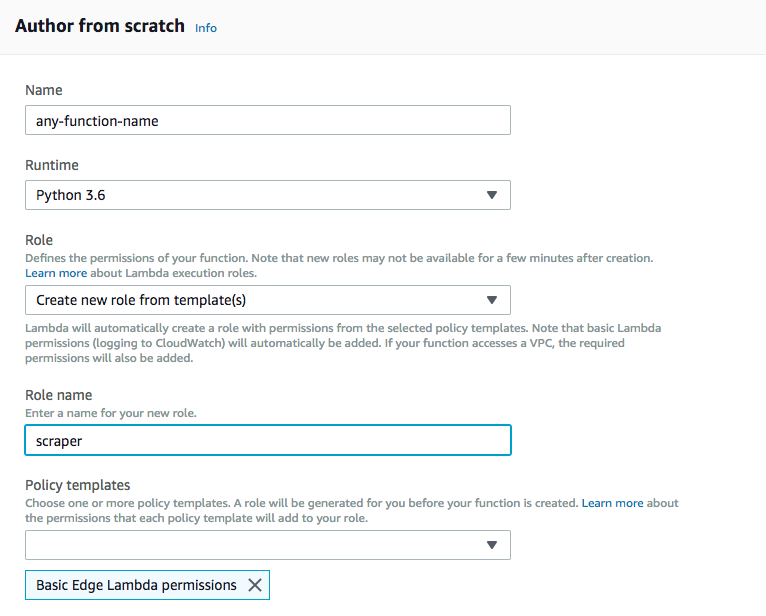
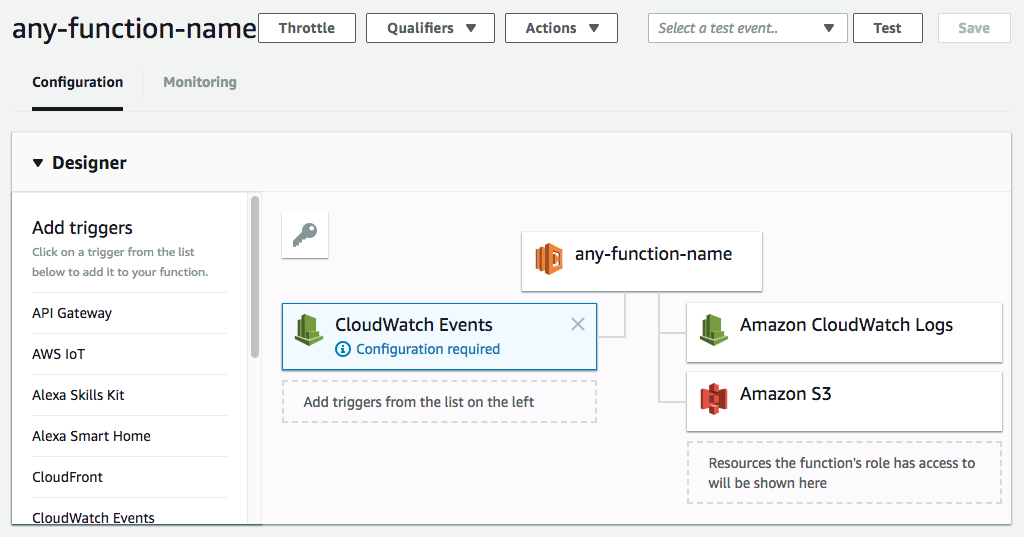
3. Now you’re in the main Lambda dashboard. Here is where you set up the triggers, environment variables, and access the logs. Since we want this to run on a schedule, we need to set up the trigger. On the “add trigger” menu on the left, choose CloudWatch Events.
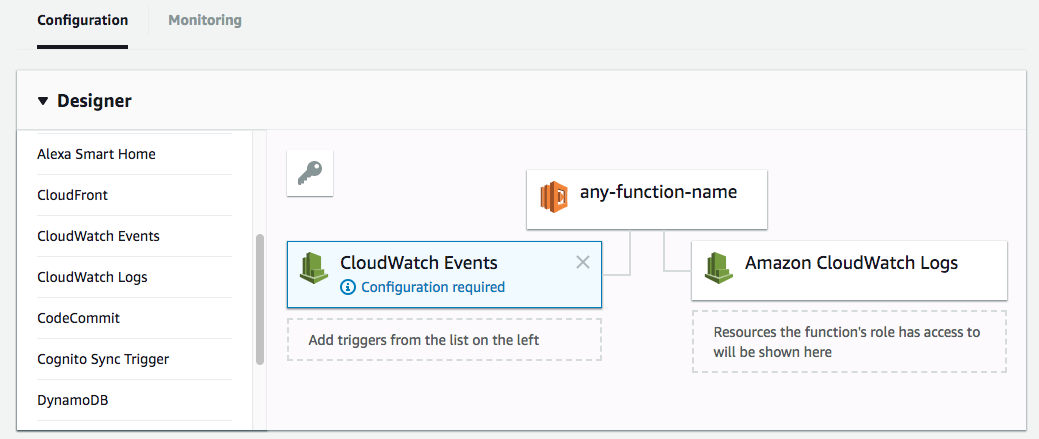
Click on “Configuration required” to set up the time the script will run. A form will appear below it.
Under “Rule” choose “Create a new rule”. Give it a rule name. It can be anything, like “dailyscrape”. Give it a description so you know what it’s doing if you forget.
Now you have to write the weird cron expression that tells it when to run. I want to scraper to run at 11 PM EST every night. In Lambda, you need to enter the time in GST, so that’s 3 AM. My expression therefore needs to be:
cron(0 3 * * ? *)
For more on cron syntax, read this.
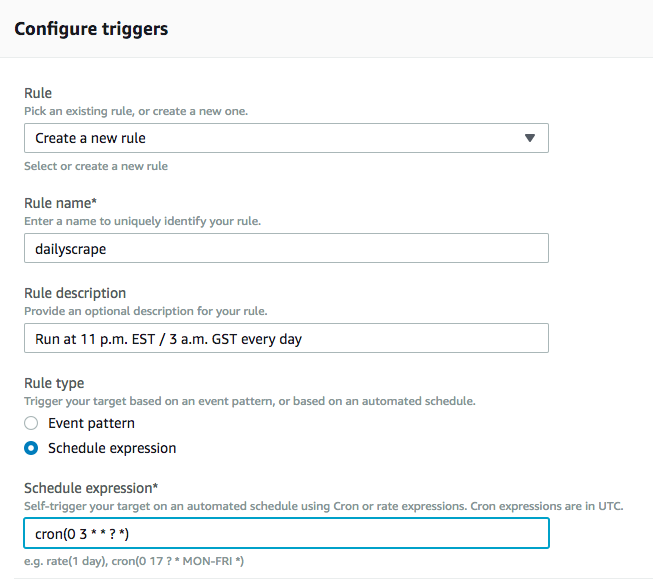
Click on “Add” and that’s it. Your function is set to run at a scheduled time.
4. Now we need to add our actual function. But first, let’s set up some environment variables.
The “Function code” section lets you write the code in the inline text editor, upload a ZIP package, or upload from S3. A Selenium scraper is big, because you need to include a Chrome browser with it. So choose “Upload file form Amazon S3”. We’ll come back to this later.
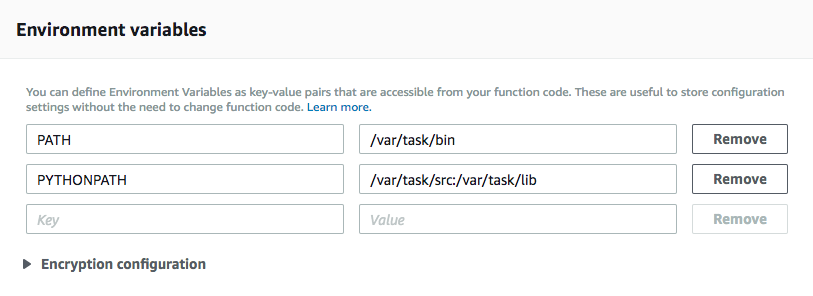
5. We need to set up our environment variables. Since we’ll be uploading a Chrome browser, we need to tell Lambda where to find it. So punch in these keys and values.
PATH = /var/task/bin

PYTHONPATH = /var/task/src:/var/task/lib
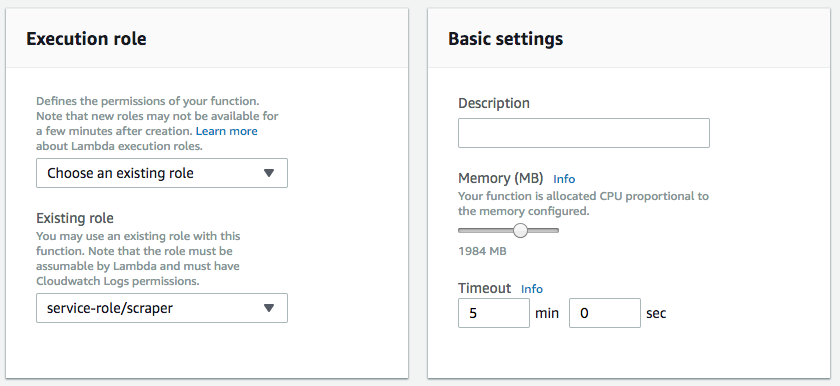
6. Finally, configure the final options. Under “Execution role”, choose the role you defined in the first step. We’ll need to configure this further in a future step.
Under “Basic settings” choose how much memory will be allocated to your scraper. My scraper rarely needs more than 1000 MB, but I give it a little more to be safe. If the memory used goes above this limit, Lambda will terminate the function.
Same with execution time. Lambda gives you a maximum of five minutes to run a function. If your scraper goes over that, you’ll need to rethink it. Maybe split it into two Lambda functions.
And that’s all the configuration we need in Lambda for now.
Hello IAM
Remember that we gave this function the most basic Lambda permissions? Well, if I want my script to write data to S3, I need to give it permission to do that. That’s where your role comes in. And you need to configure you role in IAM, Amazon’s Identity and Access Management system.
1. Go to IAM. Click on “Roles” on the left menu. You should see the role you created in the previous section. Click on it. You’ll see that it has one policy attached to it: AWSLambdaEdgeExecutionRole, the most basic Lambda permission.
2. Click on “Attach Policy”. Search for S3. Choose AmazonS3FullAccess. This will allow the function to read and write to S3. Click on “Attach policy”. That’s it. When you go back to Lambda, you should now see S3 as a resource.
Hello Docker
Now we’re ready to upload the scraper to Lambda.
But hold on. How do you know it will work? Lambda runs on Linux. It’s a different computing environment. You’ll want to test it locally on your machine simulating the Lambda environment. Otherwise it’s a pain to keep uploading files to Lambda with each change you make.
That’s where Docker comes in. It’s a tool that creates virtual machine containers that simulate the environments that you’ll deploy to. And there’s a handy Lambda container all ready for you to use.
So first, install Docker.
Then open the docker-compose.yml file you downloaded. This specifies the environment variables that you defined in Lambda earlier.
You’ll need to edit this if you want to read and write to S3 while testing from your local machine. Specifically, you need to add your S3 bucket name and AWS credentials.
version: '3'

services:
  lambda:
    build: .
    environment:
      - PYTHONPATH=/var/task/src:/var/task/lib
      - PATH=/var/task/bin
      - AWS_BUCKET_NAME='YOUR-BUCKET-NAME'
      - AWS_ACCESS_KEY_ID='YOUR-AWS-KEY-ID'
      - AWS_SECRET_ACCESS_KEY='YOUR-AWS-ACCESS-KEY'
    volumes:
      - ./src/:/var/task/src/
Then continue below.
Hello Makefile
The gentlemen at 21Buttons created a lovely Makefile that does the job of automating the creation of a Docker container, running the scraper in the Docker environment, and packaging the files to upload to Lambda.
What’s a Makefile? It’s just a recipe of command-line commands that automates repetitive tasks. To make use of Makefiles, you’ll need to install Mac’s command line tools. On Windows, it’s possible to run Makefiles with Powershell, but I have no experience with this.
I won’t go through all the items in the Makefile, but you can read about it here.
You will need to change the Makefile to download the right versions of headless-chrome and chromedriver. Like I said in the intro, the versions used by 21Buttons didn’t work for me.
This is the Makefile that worked:
clean:
	rm -rf build build.zip
	rm -rf __pycache__

fetch-dependencies:
	mkdir -p bin/

	# Get chromedriver
	curl -SL https://chromedriver.storage.googleapis.com/2.37/chromedriver_linux64.zip > chromedriver.zip
	unzip chromedriver.zip -d bin/

	# Get Headless-chrome
	curl -SL https://github.com/adieuadieu/serverless-chrome/releases/download/v1.0.0-37/stable-headless-chromium-amazonlinux-2017-03.zip > headless-chromium.zip
	unzip headless-chromium.zip -d bin/

	# Clean
	rm headless-chromium.zip chromedriver.zip

docker-build:
	docker-compose build

docker-run:
	docker-compose run lambda src/lambda_function.lambda_handler

build-lambda-package: clean fetch-dependencies
	mkdir build
	cp -r src build/.
	cp -r bin build/.
	cp -r lib build/.
	pip install -r requirements.txt -t build/lib/.
	cd build; zip -9qr build.zip .
	cp build/build.zip .
	rm -rf build
Hello requirements.txt
You’ll also need to edit the requirements.txt file to download the Python libraries that work with the Chrome browser and driver.
This is the minimum you need to run Selenium with chromedriver, and if you want read/write access to S3. That’s what the boto3 library is for
boto3==1.6.18
botocore==1.9.18
selenium==2.53.6
chromedriver-installer==0.0.6
Hello Python
You have your scraper code all ready to go, but you can’t just upload it as is. You have to set a bunch of options for the Chrome driver so it works on Lambda. Again, 21Buttons did the hard work of figuring out the right options.
Usually, when you run a Selenium scraper on you machine, it suffices to start it like this:
from selenium import webdriver

driver = webdriver.Chrome()
But we’re using a headless Chrome browser. That is, a browser that run without a UI. So you need to specify this and a bunch of other things.
This is what you need to pass. Notice the very important line near the bottom that tells Lambda where to find the headless Chrome binary file. It will be packaged in a folder called bin.
from selenium import webdriver
import os

chrome_options = webdriver.ChromeOptions()
chrome_options.add_argument('--headless')
chrome_options.add_argument('--no-sandbox')
chrome_options.add_argument('--disable-gpu')
chrome_options.add_argument('--window-size=1280x1696')
chrome_options.add_argument('--user-data-dir=/tmp/user-data')
chrome_options.add_argument('--hide-scrollbars')
chrome_options.add_argument('--enable-logging')
chrome_options.add_argument('--log-level=0')
chrome_options.add_argument('--v=99')
chrome_options.add_argument('--single-process')
chrome_options.add_argument('--data-path=/tmp/data-path')
chrome_options.add_argument('--ignore-certificate-errors')
chrome_options.add_argument('--homedir=/tmp')
chrome_options.add_argument('--disk-cache-dir=/tmp/cache-dir')
chrome_options.add_argument('user-agent=Mozilla/5.0 (X11; Linux x86_64) AppleWebKit/537.36 (KHTML, like Gecko) Chrome/61.0.3163.100 Safari/537.36')
chrome_options.binary_location = os.getcwd() + "/bin/headless-chromium"

driver = webdriver.Chrome(chrome_options=chrome_options)
Finally, you need to give your file and function a name that Lambda will know how to run. By default, Lambda will look for a file called lambda_function.py and run a function called lambda_handler. You can call it whatever you want, just make sure you change this in the Lambda dashboard (under “Handler”) and in your Makefile, under the “docker-run” command.
So if your file is called crime_scraper.py and your main function is called main(), you need to change these values to crime_scraper.main

Putting it all together
Now you’re ready to test your scraper in your local Lambda environment and package everything
1. Start Docker.
2. In your terminal, cd into your folder that has your Makefile and Docker files. Create a folder called src and put your Python scraper file in there.
3. Run this:
make docker-build
This will create the Lambda environment based on the Dockerfile, the docker-compose.yml you edited earlier and your requirements.txt file. It will also download all the necessary libraries and binaries that your scraper needs to run.
4. Now that you have a Lambda instance running on your machine, run your script:
make docker-run
Does it work? Excellent! Your code is ready to be uploaded to Lambda. If not, you have some debugging to do.
5. Create the zip package:
make build-lambda-package
This will create three folders:
bin: the location of your Chrome binary and web driver
lib: the Python libraries you need (Selenium, etc.)
src: your Python script
Then it will zip everything into a file called build.zip
Hello S3
The resulting file will be too big to upload directly to Lambda, since it has a limit of 50MB. So you’ll need to add it to an S3 bucket and tell Lambda where it is. Paste the link in the “S3 link URL” box you left blank earlier.
Save and observe
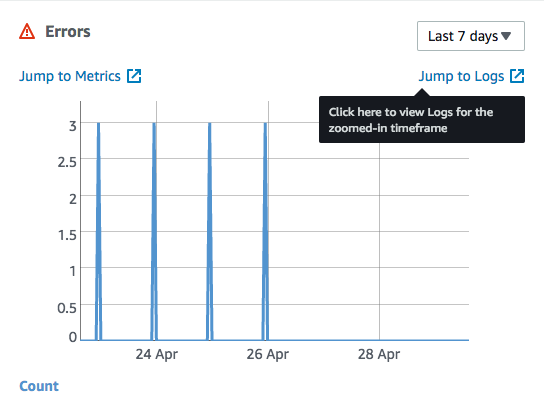
Your Lambda scraper is ready to de deployed! Click the big orange “Save” button at the top and that’s it! If there are errors, they will appear in your logs. Click on the “Monitoring” link at the top of your Lambda dashboard, and scroll to the Errors box.
Click on “Jump to logs” to see a detailed log of errors that might need debugging.
At section “Pull it all together”, one more step is needed before step 3, $ make fetch-dependencies
The `fetch-dependencies` command is actually called by the `build-lambda-package` command in the Makefile, so no need to run it separately.
It’s true that *build-lambda-package* command (i.e. step 5) does not require the step, but I think step 3 and step 4 need it. Andrew’s problem below seems to explain why the additional step is needed
Hey, there seems to be a broken link at http://robertorocha.info/wp-content/uploads/2018/04/Screen-Shot-2018-04-29-at-13.51.04.png
Oops, thanks for catching that. Fixed.
I was able to get it to create the build.zip with “make build-lambda-package” which was the instructions from the 21button git repo, you could try that. from the error “Makefile:20” it refers to line 20 of the Makefile if that helps you debug, be sure your dockerbuild.yml is filled out correctly, that you have the dependencies installed to run the Makefile (unzip, curl, pip etc) and that when indenting you use tab rather thank whitespace, the Makefile errors with whitespace. Good Luck!
Roberto, Thank you so much for the article. It’s great place to practise.
During executing command – Python
“make docker-build” stuck on error:
Step 7/10 : COPY bin ./bin
ERROR: Service ‘lambda’ failed to build: COPY failed: stat /var/lib/docker/tmp/docker-builder283874387/bin: no such file or directory
Makefile:20: recipe for target ‘docker-build’ failed
make: *** [docker-build] Error 1
Maybe you have advice on how to overcome the current error. Would be grateful, for any one, thank you
I never encountered this error and I’m really not a Docker expert to be able to help. I was lucky enough that it worked for me.
Where can we find those files?
hey Andrew. I had the same issue. I found that I needed the original /lib folder (which has libgconf-2.so.4, libORBit-2.so.0) in it, then I could do the build. hope it works for you
You may try running $ make fetch-dependencies before proceeding to step 3. Without this step, bin directory is not created and thus COPY would fail.
this is the solution. bin directory should be create before run docker-build. Check the Makefile file. on fetch-dependencies there is shell command to create bin directory
Were you ever able to fix this? I’m having the same problem 🙁
For anyone else out there who happens to be struggling with this problem, the fix was actually pretty simple.
At this point in the build, inside of my directory where I had my Dockerfile etc, there was a bin folder created, but not a lib folder. So it was trying to copy something to a folder that didn’t exist.
To fix it, I just made a lib folder in this directory.
Builds just fine now.
What to put in bin folder?
Hey mate,
Thank you for writing this guide. It’s a good one. I have managed to get it working with your help. However, i want to point out that you there is no need to delete any files after clone the pychromeless repo. Perhaps you should remove this:
Download their repo onto your machine. The important files are these:
Dockerfile
Makefile
docker-compose.yml
requirements.txt
The rest you can delete.
True, there’s no need to delete them. But there’s no need to keep them, either.
Thanks a lot for this article. I am having a problem with adding beautiful soup to the requirements.txt file. I have tried ‘bs4=4.4.1’ but it has the error:
Could not find a version that satisfies the requirement bs4==4.4.1 (from -r requirements.txt (line 5)) (from versions: 0.0.0, 0.0.1)
No matching distribution found for bs4==4.4.1 (from -r requirements.txt (line 5))
If you know how to solve this, I would be grateful if you let me know.
Thanks again!
A simple fix! Turns out the module is called beautifulsoup4 not bs4
Hi Roberto,
Thanks for the great article and solution. Have you noticed such issue when your run lambda? Locally on Docker runs fine, but on AWS I got error below:
START RequestId: b9486b8e-cd32-11e8-b275-31fda3785429 Version: $LATEST
module initialization error: Message: unknown error: unable to discover open pages
(Driver info: chromedriver=2.32.498513 (2c63aa53b2c658de596ed550eb5267ec5967b351),platform=Linux 4.14.67-66.56.amzn1.x86_64 x86_64)
Thanks,
I never got this error and don’t really know how to solve it. Good luck.
I’ve had the same problem, could make it work only after altering the options of the driver to the following:
options.headless = True
options.add_argument(‘start-maximized’)
options.add_argument(‘–no-sandbox’)
options.add_argument(‘–disable-extensions’)
options.add_argument(‘–single-process’)
options.add_argument(‘–disable-dev-shm-usage’)
options.add_argument(‘–disable-gpu’)
options.add_argument(‘–ignore-certificate-errors’)
options.add_argument(‘–hide-scrollbars’)
options.binary_location = os.getcwd() + “/bin/headless-chromium”
options.add_argument(‘–window-size=1280×1696’)
options.add_argument(‘–hide-scrollbars’)
And adding the code:
driver.maximize_window()
I hope this also works for you.
All the best.
Hi Tom. I am getting this error “unable to discover open pages” error as well using the following versions:
selenium==3.14.0
chromedriver==2.43
severless-chrome==1.0.0-55
AND
python=3.6
Did you ever find a fix for this. Cheers.
I followed these directions (thank you so much for this!), but I get this error on make docker-run and I can’t seem to figure it out:
docker-compose run lambda src/scraper.main
START RequestId: 048bb802-bc93-425c-8b97-46a2898ed4d3 Version: $LATEST
Exception ignored in: <bound method Service.__del__ of >
Traceback (most recent call last):
File “/var/task/lib/selenium/webdriver/common/service.py”, line 151, in __del__
self.stop()
File “/var/task/lib/selenium/webdriver/common/service.py”, line 123, in stop
if self.process is None:
AttributeError: ‘Service’ object has no attribute ‘process’
module initialization error: Message: ‘chromedriver’ executable needs to be in PATH. Please see https://sites.google.com/a/chromium.org/chromedriver/home
END RequestId: 048bb802-bc93-425c-8b97-46a2898ed4d3
REPORT RequestId: 048bb802-bc93-425c-8b97-46a2898ed4d3 Duration: 181 ms Billed Duration: 200 ms Memory Size: 1536 MB Max Memory Used: 20 MB
{“errorMessage”: “module initialization error”}
Makefile:23: recipe for target ‘docker-run’ failed
make: *** [docker-run] Error 1
Thoughts?
Thank you
Is the PATH correctly set in the docker-compose.yml file, and is the chromedriver file in the right folder?
Did you manage to find a solution for this? I am stuck on the same error:
AttributeError: ‘Service’ object has no attribute ‘process’
module initialization error: Message: ‘chromedriver’ executable may have wrong permissions. Please see https://sites.google.com/a/chromium.org/chromedriver/home
I think it is – I followed your instructors exactly using the same docker-compose.yml. Chromedriver is in bin, my code in src, etc. I started trying different PATH settings but nothing is working. 🙁 I don’t understand why it would not work when I used exactly the same files as you. Maybe it has to do with my Docker version..?
Hard to say for sure. Keep trying different things until it works. It’s what I did.
Hello,
Thank you for the blog, I got it to work on lambda however when i check the screenshot uploaded to S3, it is just a blank screen. Would you be able to assist? My code is below:
from selenium import webdriver
import time
import os
import boto3
def lambda_handler(event, context):
chrome_options = webdriver.ChromeOptions()
chrome_options.add_argument(‘–no-sandbox’)
chrome_options.add_argument(‘–disable-gpu’)
chrome_options.add_argument(‘–window-size=1280×1696’)
chrome_options.add_argument(‘–user-data-dir=/tmp/user-data’)
chrome_options.add_argument(‘–hide-scrollbars’)
chrome_options.add_argument(‘–enable-logging’)
chrome_options.add_argument(‘–log-level=0’)
chrome_options.add_argument(‘–v=99’)
chrome_options.add_argument(‘–single-process’)
chrome_options.add_argument(‘–data-path=/tmp/data-path’)
chrome_options.add_argument(“user-agent=Mozilla/5.0 (X11; Linux x86_64) AppleWebKit/537.36 (KHTML, like Gecko) Chrome/61.0.3163.100 Safari/537.36′”)
chrome_options.add_argument(‘–headless’)
chrome_options.add_argument(‘–ignore-certificate-errors’)
chrome_options.add_argument(‘–homedir=/tmp’)
chrome_options.add_argument(‘–disk-cache-dir=/tmp/cache-dir’)
chrome_options.binary_location = os.getcwd() + “/bin/headless-chromium”
browser = webdriver.Chrome(chrome_options=chrome_options)
browser.get(“https://www.civitekflorida.com/ocrs/app/search.xhtml”)
time.sleep(5)
pic =browser.get_screenshot_as_file(‘/tmp/FL.png’)
s3 = boto3.client(‘s3’)
filename = ‘/tmp/FL.png’
bucketname = ‘cdbucketswordy’
s3.upload_file(filename, bucketname, ‘FL.png’)
Thank you!
I’ve never taken screenshots before, so it’s not something I can help with. But looking at your code, it seems you’re saving the screenshot to the variable pic and not using that variable later. You’re just saving a blank png filename.
Hi, I was wondering how you were even able to get that code to run? I tried running the exact code you ran it and am getting an error. I am not sure how to run this with regular selenium web driver. It only seems to work with webdriver wrapper.
Thanks for putting this together. It was immensely helpful. For my project I had to remove the single quotes from the environment AWS variables in docker-compose.yml to get my credentials to work correctly.
Ah yes, those are just placeholders for the real credentials. The single quotes don’t need to be there.
Thanks for putting this together, I was wondering if there would be a problem (my guess is there would be) if my scraper actually uses a UI. I’ve been working on a project using scrapy and selenium to send and retrieve data from a website, I’ve been running this on my computer but as you very well said, it would be more convenient to have it running on a server.
If you want your scraper to be serverless, there’s no reason for it to have a UI. You won’t be able to see it anyway. There are several headless browsers for this, like Chrome, Firefox, and PhantomJS.
I followed the tutorial but I was lost in the last point. I don’t have a main function, just a Python script with selenium and I don’t need to save/write any object to S3. What should be the name of my handler? blank? Leave it as lambda_handler?
Can you refactor your script so it’s inside a function?
I guess I can refactor my script to make it inside a function (even if it has no parameters). My script is very simple, it just books a class at 7 am. I cannot be on the computer at that time and they get all booked in 5 minutes.
A bigger problem is that I have windows 10 Home and I cannot install Docker either. Is there a way to install headless Chrome in Lambda with the few python libraries I need (selenium, pandas, datetime, time and numpy), and then just copy paste the code in the Lambda editor?
Hey there is no Python 3.5 version on Runtime then what I need to select for this
You can only select versions 2.7, 3.6 and 3.7 in Lambda.
This versions of chromedriver and headless-chrome worked for me:
curl -SL https://chromedriver.storage.googleapis.com/86.0.4240.22/chromedriver_linux64.zip > chromedriver.zip
curl -SL https://github.com/adieuadieu/serverless-chrome/releases/download/v1.0.0-57/stable-headless-chromium-amazonlinux-2.zip >
also i have to edit the requirements.txt:
chromedriver-installer==0.0.6 -> chromedriver-install==1.0.3
Thanks for the help. I was wondering what should the new URL be for the makefile for chromedriver and headless chrome?
With the current set up I get this: Exception: Unable to get latest chromedriver version from https://sites.google.com/a/chromium.org/chromedriver/downloads
It looks like Google changed the URLs of the hosted file and versions below 2.46 are no longer offered. I’m afraid you’ll have to experiment with different versions until you find one that works.
Consult the website that you linked to to see the currently supported versions.
for anyone still reading this tutorial (which is REALLY well written btw) – i don’t thinkis chromedriver-installer==0.0.6 is actually needed in your requirements.txt, since chromedriver-installer is merely downloading the chromedriver into your bin folder.
One because it will keep throwing the following error (at least for me) that it isn’t able to find the chromedriver to download from the chromedriver link
Two because when you do make fetch-dependencies you are already creating /bin with chromedriver & headless- chromium, and you need to do make fetch-dependencies in order to avoid some of the errors previously listed.
@For the author – is it possible to list in the tutorial some of the compatible versions when it comes to chromedriver, selenium & chromium. Looks like last stable version of headless-chromium is <70, so make sure to use an older version of chromedriver & older version of selenium as well.
Thanks for the comment. I’m no expert in this, just I’m just sharing what worked for me. If this is causing problems for others, I hope this will help them. As for listing compatible versions, I don’t think I’ll be testing all the combinations of versions that work. But if this is something you do, I’d be happy to update the post with your solutions.
I was using the WRONG Dockerfile! I was using the one from lambci instead of 21buttons. Ahhh!
Anyway, there were a few other things, like I had to delete the last line in your requirments.txt file like the other guy said.
And I had to fix the lambda_function.py file by removing some of what 21buttons used. But it worked!
Go to Code -> Runtime Settings -> and change your handler to “src.lambda_function.lambda_handler”
My code works all the way until the last step, and then the AWS logs say:
Unable to import module ‘lambda_function’: No module named ‘lambda_function’
Not sure why yet…
OK I got it! I had started over with a 2nd function and forgot to add the Lambda Environment variables back in.
Then I also misspellled “PYTHONPATH”. Then, I’d also seen advice on other forums to zip all of the files (not just the main folder), so I did that for the files in the Src folder, which didn’t seem to hurt.
Then I ran “make build-lambda-package” in command line terminal again, uploaded the build.zip to the S3 Management Console, copied its path for the Amazon S3 link url in the Lambda Management Console, and saved it. Voila!
The error went away and instead, now it’s printing out the comments from my lambda_function.py file into the CloudWatch Management Console logs. I hope this helps someone else. It took me a week to set this up!
chromedriver-installer == 0.0.6
is depricated, replace it in the requierements.txt by:
chromedriver-install==1.0.3
Thanks for this.
I tried following this, and also adding the library pandas.
The problem is that the unzipped file is above the Lamda maximum file size. Do you have any advice?
Upload the file via S3, as mentioned in the post.
It works perfectly on my docker environment, but when i upload to S3 and try to test, i get:
“errorMessage”: “Unable to import module ‘lambda_function'”
Can you help?
You probably didn’t change the name of the function to be called in Lambda. The post explains it all.
Hello Roberto, how to run the scraper without docker? (Since it’s just for testing, i guess)
Do i just zip 3 folders (src, lib, bin) and upload it to lambda? How tobspecify the environment variable in lambda? Thank you
You can just skip the Docker section and remove the two docker commands in the Makefile. The post explains how to set the env variables.
I am also getting this error.
selenium.common.exceptions.WebDriverException: Message: Service /build/bin/chromedriver unexpectedly exited. Status code was: 127
I get the above error on the below versions:
chromedriver 2.43
severless-chrome 1.0.0-55
selenium 3.14
and
serverless-chrome v. 0.0-37
chromedriver v. 2.37
Selenium for Python v. 2.53.6
For the following error:
selenium.common.exceptions.WebDriverException: Message: Can not connect to the Service /build/bin/chromedriver
I get it on version:
serverless-chrome v. 0.0-37
chromedriver v. 2.37
Selenium for Python v. 2.53.0
I would sincerely appreciate any help. Thank you.
I am also getting this error (mistakenly replied to the comment above)
Have you found out how to fix it? I have the same error.
am also getting this error, has anyone figured it out?
I continue to get the following error when running the lamba in aws “Message: ‘chromedriver’ executable may have wrong permissions.
I’ve tried using chmod but the environment is read only so that doesn’t work. Has anyone else seen this problem?
Were you able to solve this issue?
Hey guys,
I have solved this by moving the chromedriver and headless chromium to a tmp folder and changing the permissions. This will work for you
from selenium import webdriver
from shutil import copyfile
import os
import time
def permissions(origin_path, destiny_path):
copyfile(origin_path, destiny_path)
os.chmod(destiny_path, 0o775)
def lambda_handler(*args, **kwargs):
chrome_options = webdriver.ChromeOptions()
chrome_options.add_argument(‘–headless’)
chrome_options.add_argument(‘–no-sandbox’)
chrome_options.add_argument(‘–disable-gpu’)
chrome_options.add_argument(‘–window-size=1280×1696’)
chrome_options.add_argument(‘–user-data-dir=/tmp/user-data’)
chrome_options.add_argument(‘–hide-scrollbars’)
chrome_options.add_argument(‘–enable-logging’)
chrome_options.add_argument(‘–log-level=0’)
chrome_options.add_argument(‘–v=99’)
chrome_options.add_argument(‘–single-process’)
chrome_options.add_argument(‘–data-path=/tmp/data-path’)
chrome_options.add_argument(‘–ignore-certificate-errors’)
chrome_options.add_argument(‘–homedir=/tmp’)
chrome_options.add_argument(‘–disk-cache-dir=/tmp/cache-dir’)
chrome_options.add_argument(‘user-agent=Mozilla/5.0 (X11; Linux x86_64) AppleWebKit/537.36 (KHTML, like Gecko) Chrome/61.0.3163.100 Safari/537.36’)
try:
permissions(os.getcwd() + ‘/bin/chromedriver’,’/tmp/chromedriver’)
permissions(os.getcwd() + ‘/bin/headless-chromium’,’/tmp/headless-chromium’)
except:
print(“file is busy”)
finally:
Hi Roberto,
thanks a lot for the very useful post.
I’m following exactly your instructions but I’m getting error on AWS Lambda that says
‘chromedriver’ executable may have wrong permissions
or
[Errno 30] Read-only file system: ‘/var/task/bin/chromedriver’
Do you maybe know how to solve this issue?
Is there a way to pass the aws token to the docker container to run a lambda function that saves to s3 locally ?
Hi there, I have the environment built and works perfectly except that I cannot download files.
In the code, there is a section talks about enable chrome headless download. However, no downloaded files were found.
Very sad, I guess I need to find other solutions other than 21buttons.
Hello!
Did you find any other solution thath works for the first try? 😀
I followed new version(chromedriver 2.43, severless-chrome 1.0.0-55, selenium 3.14) also added all options to chrome as you mentioned but getting below error:
I’m just trying to run my python code to test without Docker even Lambda on just EC2 as got stuck on Makefile.
selenium.common.exceptions.WebDriverException: Message: unknown error: Chrome failed to start: exited abnormally
(Driver info: chromedriver=2.37.544315 (730aa6a5fdba159ac9f4c1e8cbc59bf1b5ce12b7),platform=Linux 4.15.0-1057-aws x86_64)
Also tried with newest Chorme but same error. Any idea?
Hi Mike!
Did you find any solution for this problem, i have the same issue?
Hi mate great post.
Do you know if headless chrome works differently to normal chrome
The reason I ask is that if I scrape a site for example, https://car.gocompare.com/vehicle
and send keys for a vehicle, in normal chrome it produces the reg details, if I use headless chrome it cannot find it,
Is this down to the chrome driver and headless, or is it down to the website? How can you spot whats caused, btw it works in firefox.
Is there a reason that this runs in selenium web driver wrapper as opposed to regular selenium?
In other words, how can you configure this to use regular web driver commands? It seems to give an error when I do that.
I guess you already figured it out, but for others who just got this error and still didn’t.
your python function inside your scraper should accept to arguments. like this:
def lambda_handler(*args, **kwargs):
….your scraping code using the driver
Hey all!
So I’ve gotten to the point (finally!) of running docker-build and this thing successfully building, but when I try docker-run, I end up getting a type error saying lambda_handler() takes 0 positional arguments but 2 were given. Anyone have any advice? Total newbie to both AWS, Selenium, and Docker, so I’m amazed I’ve made it this far
Were you able to figure it out?
Your comment is awaiting moderation.
I guess you already figured it out, but for others who just got this error and still didn’t.
your python function inside your scraper should accept to arguments. like this:
def lambda_handler(*args, **kwargs):
….your scraping code using the driver
Why do we need chromedriver-installer in requirements.txt if we download chromedriver manually?
Is it possible to put several functions inside the python scraper in the src folder? It will be great if anyone can share what the scraper and lambda function should look like. Also how can we export the scraped data to was?
Unfortunately I am getting many many errors trying to follow this!!! Nione of the make commands seem to work at all.
Took a long time to get this working but you are the only person on the internet with a decent guide on how to do this.
I highly recommend to anyone trying this out.
Keep the downloaded repo from the start exactly the same.
Make SURE you’re using python 3.6, that’s important.
Ignore all of the stuff this guy said to do with the makefile/requirements.txt and whatever. Just leave everything exactly as it was in the repo.
I wasted so much time trying to change versions and get them compatible, and in the end I just redownloaded the repo and changed nothing, and it worked.
“2. Click on “Attach Policy”. Search for S3. Choose AmazonS3FullAccess. This will allow the function to read and write to S3. Click on “Attach policy”. That’s it. When you go back to Lambda, you should now see S3 as a resource.”
When I attach the AmazonS3FullAccess and go back to Lambda, there is no change. S3 isn’t displaying as a resource? What might I be doing wrong
The tutorial is not working for me when I run ‘docker compose build’. I get this error:
ERROR: Service ‘lambda’ failed to build : COPY failed: file not found in build context or excluded by .dockerignore: stat lib: file does not exist
I keep getting the message “Unable to import module ‘src/lambda_function’: No module named ‘selenium.webdriver.common'”. Did anyone else see this? I think it must be to do with the PATH not being specified correctly as it can’t find the modules of selenium, but can’t figure where its going wrong.
Hey Nick, I’m having the same issue. Were you able to determine a fix?
Hey MN, Im having the same issue,
Unable to import module ‘src.lambda_function’: No module named ‘src’
Found the issue? Thanks!!
src is the name of the folder with your script, not the name of the script file. You call the function by punching in ‘file_name.function’. So if your file is scraper.py and the function that runs everything is main(), your function call in Lambda should be scraper.main
our application has login page with google captcha enabled. somehow if i try to login, it is popping “are you a robot” message. I am using chrome headless browser. any help here ? why it is saying “are you robot” on this setup ( AWS Lamda Python Chrome headless ).
Hey Roberto, thank you very much.
Everything worked fine and make docker-build runs succesfully. But then when trying to run make docker-run, i get the following error:
{“errorMessage”:”Unable to import module ‘src.lambda_function'”}
I do have the python (lambda_function.py) inside the src folder, so I don’t understand what is wrong. Help? Thanks!
Hi, I have the environment built and works perfectly except that I cannot download files.File does not start downloading. Could you please help. I am struggling for this for quite a long time. Thanks
Excellent guide, was able to get things working with the help of some comments here as well.
One issue I ran into was getting through a login page generated by JS. I was able to come to the conclusion that the issue had something to do with serverless-chrome (no issues when testing locally without the –headless option).
Changing from v1.0.0-37 to v1.0.0-57 solved my issues.
Just by changing this line in the Makefile:
curl -SL https://github.com/adieuadieu/serverless-chrome/releases/download/v1.0.0-57/stable-headless-chromium-amazonlinux-2.zip > headless-chromium.zip
Alec,
I had the same issue. I spent two hours trying to figure out why the cookies were not working properly. I tried many chromedriver / headless-chromium combinations and always encountered some random error.
Your suggestion fixed my issue, I don’t think I could have found this myself.
Thanks a lot, now you have a friend in Buenos Aires
Everyone make sure you’re using the right python version on your local. For this example that’s 3.6
This didn’t work for me until I followed this comment: https://github.com/heroku/heroku-buildpack-google-chrome/issues/46#issuecomment-396783086
I specifically added
chrome_options.add_argument(‘–disable-dev-shm-usage’)
Firstly, thank you Roberto for taking the time out to share your work and for providing a guide for taking this approach. It is much appreciated.
To get mine working, I did the following:
1. Created a bin folder in the repo. This solved the issue for Lambda service failure which I saw some of the others encountered.
2. I encountered issues with doing a pip install on chromedriver_install. It produced an error saying it couldn’t find the latest. I removed it from the requirement.txt and went directly to https://sites.google.com/a/chromium.org/chromedriver/downloads and manually download the chromedriver then add it to the bin folder created earlier.
3. Did the same by manually running curl -SL https://github.com/adieuadieu/serverless-chrome/releases/download/v1.0.0-57/stable-headless-chromium-amazonlinux-2.zip > headless-chromium.zip then unzip that file to the bin directory created earlier as well.
4. The versions I used are as follows:
chromedriver: 86.0.4240.111
headless-chromium – v1.0.0-57
selenium: 3.141.0
I keep getting this error… Does anyone have any idea how I can fix it
raise WebDriverException(“Can not connect to the Service %s” % self.path)
[ERROR] WebDriverException: Message: Can not connect to the Service chromedriver Traceback (most recent call last): File “/var/task/src/lambda_function.py”, line 31, in lambda_handler driver = webdriver.Chrome(chrome_options=chrome_options) File “/var/task/lib/selenium/webdriver/chrome/webdriver.py”, line 61, in __init__ self.service.start() File “/var/task/lib/selenium/webdriver/common/service.py”, line 88, in start raise WebDriverException(“Can not connect to the Service %s” % self.path)
thank you so much for this article.
BEST TIP: Download the repo and follow the guide exactly then try to reverse engineer everything. You will save yourself lots of time (I’ve tried for 4 days and finnaly got it to work). You don’t have to change anything in the repo. Don’t add anything until you get it to work in Lambda
My requirement.txt:
selenium==2.53.0
chromedriver-binary==2.37.0
Dude if you are gonna do a tutorial show all the code you are using and don’t make us guess at what you are running. If you are thinking about trying this tutorial out don’t bother. Its a headache and you can look at 98 comments of errors to prove it.
It doesn’t matter what code you’re running if you don’t get the setup right. My script could just be
print("Hello.")but it won’t run if I don’t configure things properly.You know what – I apologize for that comment. I shouldn’t condemn some hard work put in by a stranger. I am struggling and I suck at coding so that is the probably the core reason, not this tutorial.
We all suck at the beginning! This is hard stuff to master.
While this is a great tutorial, it is a bit outdated. I would recommend uploading the package as a layer. In this video + linked github you will already find a packaged zip file that you can upload to Lambda as a layer. You can have a working selenium web scrapper set up in minutes. This tutorial is filled with errors and headaches. Instead look here to save time:
https://www.youtube.com/watch?v=jWqbYiHudt8&ab_channel=soumilshah1995
https://github.com/soumilshah1995/Selenium-on-AWS-Lambda-Python3.7
Good point, I have updated the intro to explain this.
This tutorial is excellent, and was written in 2018. To complain 4 years later is a poor reflection on you.